Total Video Converter for Mac
Excellent All-in-One Video Toolbox to Convert, Edit Video, Burn DVDs and more.
As is known to all, fade in and fade out transitions can prevent your video from appearing choppy. Video fade-ins begin at a natural black screen to the video picture and video fade-outs begin at the video picture to a neutral black screen. Audio fade-ins begin with silence and increase to full volume, and fade-outs begin at full volume and decrease to silence. This tutorial explains how to fade in and fade out your video and audio tracks.
Download and install MovieMator from our official website or Mac App Store. It is a quite powerful video editing software for Mac and Windows.
| Mac OS X 10.10 + |
Windows 10/8/7, 64-bit |
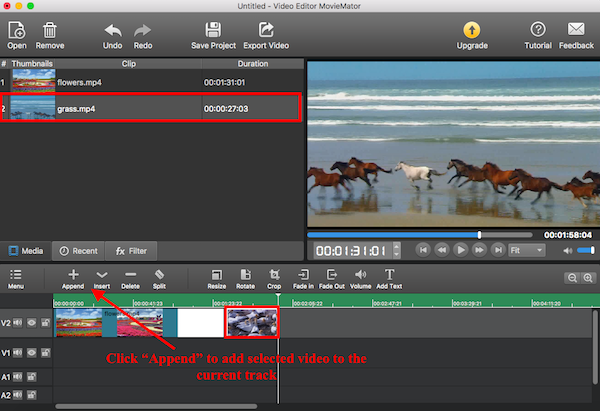
Launch MovieMator and add the target video/audio files to the representative track on the timeline. Video clips should be placed on the video track and audio files should be placed on the audio track. There are 2 ways to achieve this task. One is to append files to the timeline and the other is to insert files to the timeline.
Method 1: Append files to the current track. Select the target file and click “+” button, or drag & drop the target file from your "Finder" to append it to the representative track on the timeline.

Method 2: Insert files to the current track. You can select a file at first and then click “Insert” button to insert the video behind “Playhead”, or just drag & drop the target files from the “Media Library” of MovieMator to the specific position on the timeline.

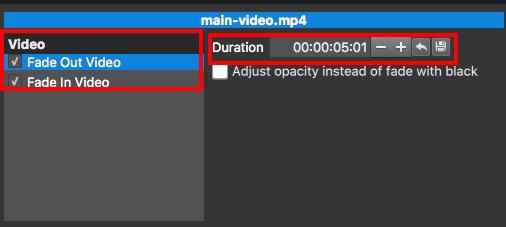
Select the target video clip and click on “Filter” tab on the main interface, then click “+” button to add “Fade in Video” and “Fade Out Video” filters to the target video clip. When you add the filters, you can set the duration time of the fade effect to control the gradient effect of the video picture. What is more, you are allowed to preview the effect by playing this video.

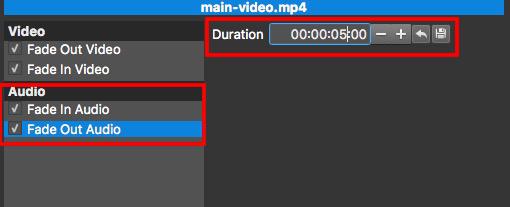
If your video clip contains an audio track, you can select this clip and add “Fade in Audio” and “Fade Out Audio” filters to the target video clip by clicking on “Filter” tab on the main interface. After then, set the duration time to control the change of audio volume. If you want to add audio fade-ins and fade-outs to another different audio clip on the audio track, just select the audio clip firstly, then follow the above steps to add “Fade in Audio” and “Fade Out Audio” filters to the target audio clip.

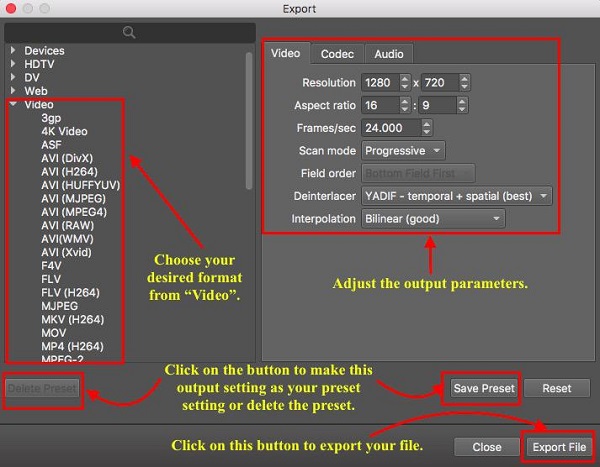
Click on "Export" button on the main interface to export the final video by format or by device when you completed editing videos. If necessary, you can change the advanced settings like resolution, aspect ratio and etc. Finally, click on “Export File” to choose the destination folder and click on ”Save” to export the video.

Excellent All-in-One Video Toolbox to Convert, Edit Video, Burn DVDs and more.
Download Any Video, Music and Live Streaming from YouTube, Facebook… 1000+ video sites.
Excellent All-in-one Video Player for Mac to Smoothly Play Blu-ray Discs and 4k Videos.